Submitting a Work Item
Submitting a Work Item using the Map
- Identify the work order's location on the map by zooming to or searching for an address.
- Select the Create New Work Item button (
 ) on the Toolbar.
 - Click as close as possible to the work order's location.
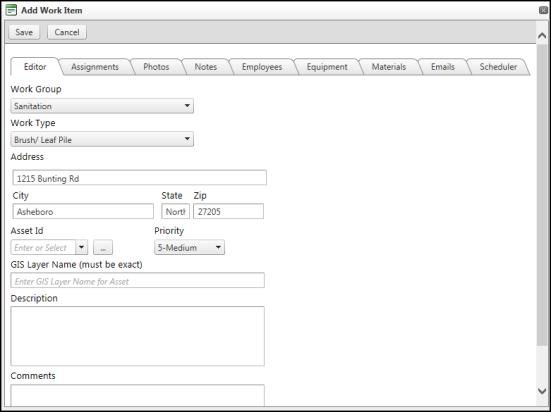
- Select the appropriate Work Group and Work Type.
- Confirm the Address is correct.
- Enter a Description to describe what job is being performed.
- Enter any Comments to describe what was done to complete the job.
- You can enter additional information, such as Assignments, Photos, and transactions to the new work item using the tabs at the top of the Add Work Item window.
- Click the Save button at the top of the window to submit the work item.

Submitting a Work Item through an Address Search
- Click the Search Header in the Sidebar.
- Enter your search criteria. *Note: When you search for an address, you must enter the street address, city, and state.
- Click the magnifying glass icon next to the address field to search.
- Click on a number in the Data Grid to zoom in to that location.
- To enter a Work Item, click the Create New Work Item button (
 ) next to the desired address listed in the Data Grid.
 - Fill out the information for the work item in the Add Work Item pop up window that appears.
- Click Save to submit the work item.
Submitting a Work Item using GIS Data
- Click the GIS Data header in the Sidebar.
- Check the box to turn on a base map for the GIS layer that is associated with this work item, for example Water Valves or Street Lights.
- Click the Identify Base Data tool (
 ) on the Toolbar.
 - Click on the area of the map you would like GIS Data from.
- GIS Data will appear in the Data Grid from the location selected.
- To enter a Work Item, click the Create New Work Item button (
 ) next to the desired GIS data point listed in the Data Grid.
- Fill out the information for the work item in the Add Work Item pop up window that appears.
- Click Save to submit the work item.
